Saturday, March 23, 2013

Bunny Hat - Free Pattern


Do you believe in the Easter Bunny?


Easter is almost here! I finished this pattern and TWENTY-FOUR holiday orders just in the nick of time. Enjoy this free pattern and have a Happy Easter.


This hat is sized to fit most 6-9 month old babies with a 16-19 inch head circumference. Two DC = approximately 1 inch, so keep that in mind if you need to add or remove inches to fit your little one.


This is a chunky hat so you’ll work two strands of yarn at the same time. I used a N-9.00MM Crochet hook. Note, the CH 3 in each round of the hat does not count as the first DC.

I always use Hobby Lobby's "I Love This Yarn". Its very soft and works out great for all the baby hats I make.

Key:
CH = Chain
DC = Double Crochet
HDC = Half Double Crochet
HDC DEC = Half Double Crochet Decrease
SL ST = Slip Stitch


Hat.
Magic Circle
Round 1: CH 3. 10 DC inside the circle. Join with SL ST to the top of CH 3 (10DC)
Round 2: CH 3. 2DC in each DC. Repeat around. Join with SL ST to the top of CH 3 (20DC)
Round 3: CH 3. *2DC in first DC, DC in next DC* Repeat around. Join with SL ST to the top of CH 3 (30 DC)
Round 4: CH 3. *DC in first DC, DC in next 5 DC* Repeat around. Join with SL ST to the top of CH 3 (35 DC)
Round 5-7: CH 3. DC in each DC around. (35 DC)
Round 8: CH 1. Finish off using your favorite stitch. I used a back stitch loop around. Finish off and weave in ends.

Ears:
You will need to make two of these pieces in the same color as the bunny hat, as well as two more in the inner ear color for a total of 4 pieces. Later you will crochet them together and that will form two full bunny ears.
For this portion I switched to a smaller hook. I chose an I/9-5.5MM crochet hook, but you could use whatever size you prefer. A smaller hook will make a smaller inner ear triangle shape, a large hook will make a larger ear triangle. These pieces are not chunky, so you will use a single strand of yarn for all four ear pieces.


Inner Ear Triangles:
*CH 7
Row 1: In the second CH from the loop HDC and continue across. (6 HDC)
Row 2-4: CH 1 and turn. HDC in each HDC. (6 HDC)
Row 5: HDC DEC. HDC in next 4.
Row 6: CH 1 and turn. HDC DEC. HDC in next 3
Row 7: CH 1 and turn. HDC DEC. HDC in next 2
Row 8: CH 1 and turn. HDC DEC. HDC in next 1
Row 9: CH 1 and turn. HDC DEC. Finish off.*
*repeat 3 more times to make a total of four pieces. Two in the bunny hat color and two in the inner ear color.

Once all four pieces are complete you will put alternating colors back to back and crochet them together using HDC’s. Put the inner ear color on top of the hat colored piece (should be mirror images of each other). I chose a larger hook for the rim around the ear and used a size K crochet hook. Again, that is simply what I chose in the moment; you could go smaller or larger depending on your preference and how tightly you crochet. The trim around the ears is chunky so once again you’ll work two strands of yarn simultaneously.
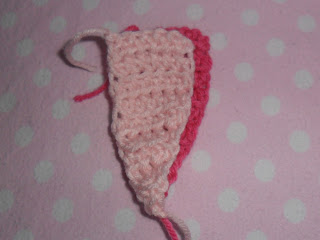


Using the hat colored yarn, begin in one of the bottom corners and begin to crochet through both pieces using HDC’s. This will hold both pieces together and make a nice rim around each ear. Use 2 HDC’s to round each corner. Once you’ve gone completely around, Join to your first HDC with a SL ST, finish off and leave a long tail for sewing.


Position the ears where you want them and sew them on! This part is more art than science. The ears turn out best with fewer stitches. I chose to sew the ears on the second round that way they were positioned nice and high on the top of the head. The ears do not need to be sewn on exactly the same. It turned out really cute if one ear is a little floppy or maybe turned to the side a little bit. Don’t worry too much about making them perfect. Just like real bunnies, each ear is unique.

EDITED TO ADD STITCHING DETAILS:

The first 3 stitches are most important to shape the ear and give it a good foundation to stand up tall.

Stitch 1:


Stitch 2:


Stitch 3:


Pull tight and now your ear should look something like this. From here all you need to do is finish securing the back side of the ear to the hat and you're done!


THE FINISHED PRODUCT!


A big thanks to Corinne McCombs Photography for the lovely photo of the turquoise bunny hat and to Ikon Photographs for the picture of the white bunny hat. You can view more of their work on their facebook pages:

https://www.facebook.com/pages/Corinne-McCombs-Photography/133464376729019?fref=ts

https://www.facebook.com/ikonphotographs

Wednesday, March 6, 2013

PATTERN: Flapper Inspired Baby Hat

Inspired by the 1920's flapper hats, this pattern will fit a 3-6 Month old.

Color: "Rosy Cheeks" & "Coffee" I Love This Yarn Solid Yarn from Yarn Bee (Hobby Lobby).
Contents: 100% Acrylic
Yarn Weight: 4 - Worsted
Recommended Crochet Hook: 5.5mm (USA Size: I-9)
Crochet Gauge: 12 single crochet x 15 rows = 4"
Skein Weight: 7 ounces
Skein Yardage: 355 Yards


Hat:
Beginning with "Rosy Cheeks" color. Magic Circle. CH 3
Round 1: 10 DC in the center. Join with SL ST to the top of the CH. CH 3 (10DC)
Round 2: 2 DC in eadh DC around. Join with SL ST to the top of the CH. CH 3 (20DC)
Round 3: *2 DC in first DC, DC in next*. Repeat around. Join with SL ST to the top of the CH. CH 3 (30DC)
Round 4: *2 DC in first DC, DC in next 2*. Repeat around. Join with SL ST to the top of the CH. CH 3 (45DC)
Round 5-8: DC in each DC. Join with SL ST to the top of the CH. CH 1 (45DC)
Round 9: Swith to "Coffee" color SC in each DC around. Join with SL ST . CH 1 (45SC)
Round 10: SC in each DC around. Join with SL ST. CH 3. (45SC)
Round 11: DC in each SC around. Join with SL ST to the top of the CH. Finish off & weave in ends.

Bow:
In "coffee" color CH 19.
Round 1:CH 2 (this counds as 1st HDC). HDC In the 3rd Ch from the hook. Continue and HDC in each CH across. (20HDC)
Round 2: Turn CH (CH 2 counds as 1st HDC). HDC in each HDC across (20HDC)
Round 3-4: Repeat Round 2.
Finish off the lovely rectangle you just made by working a SC in each "stitch" around. Use 2 SC's to round the corners. Finish off and leave a long tail
Weave the long tail in and out of the SC's until you reach the center of the row. This is where you will wrap using the long tail to sinch it in the middle creating the bow shape. Wrap until you reach a desired thickness & width. Tie a knot on the BACK SIDE and tuck the loose end into the bow so it will not show.
Sew the bow onto the hat where you see fit and you're done!

Monday, March 4, 2013

Comforter Up-Cycle

My old jean comforter had seen better days. It was ripping at the seams exposing the stuffing inside and was beyond repair for use as a comforter as originally intended. The idea of simply throwing it away didn't appeal to me because of the massive waste so I decided that an Up-Cycle project would be more fitting. It was Oh-So-Soft after years of loving use, so why not give this old worn out comforter new life?

This was my weekend project.


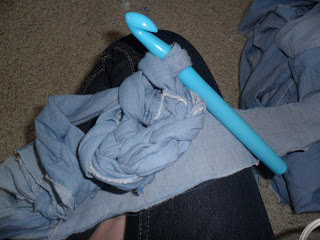
First I separated the jean fabric at the seams and removed the stuffing.


Then I cut 1-2 inch strips of fabric lengthwise and tied the ends together with loose double knots.


Once I had a long strip of fabric knotted together at the ends I used the largest crochet hook I could get my hands on and began working away. I started by making a chain of 4, joining to the first chain with a slip stitch then began working 2 single crochets into each chain around as needed. There is no set pattern, I just eyeballed it to make sure I was increasing the circle enough with the varying width of yarn that I had. To start off I had 2 SC's in each chain, then as the circle grew I alternated 2SC and 1SC in each chain.


The cats love the finished project! Its thick and soft and just big enough for one of them to enjoy at a time. I did not worry about neatly tucking away and hiding the loose knotted ends. I let them stick out in whichever way they fell naturally because the bed actually looks pretty neat that way. Plus its an added bonus since the cats seem to like playing with the ends as an extra cat toy.

Im sure this project would work with all sorts of old fabric. Sheets, blankets, comforters, throws - you name it. Enjoy!

Tuesday, February 26, 2013

PATTERN: Dr Seuss Hat & Matching Leg Warmers

Dr Seuss Hat & Matching Leg Warmers.

My son's pre-kindergarten class will have a Dr Seuss party next week at school and thinking ahead to that day inspired this little pattern for my younger daughter.

This pattern will make a 0-3 Month size hat and leg warmers.

SL ST = Slip Stitch
DC = Double Crochet
CH = Chain

This is a chunky style hat so you will need a large hook. I used N (9.00MM) and you'll work two stands of yarn simultaneously.


Hat:

Beginning with red: Magic Circle, CH 3, 10 DC in the round. (10 DC)
Round 2: Switch to white. CH 3. 2 DC in each DC. (20 DC)
Round 3: Switch to Red. CH 3. *2 DC in first. DC in next two DC*. *repeat around. (27 DC)
Round 4: Switch to white. CH 3. DC in each DC (27 DC)
Round 5: Swith to Red. CH 3. DC in each DC (27 DC)
Round 6: Switch to white. CH 3. DC in each DC (27 DC)
Round 7: Switch to teal. CH 3. DC in each DC (27 DC). Finish off & weave in ends

Pom Pom:

Make the pom pom using the teal yarn. I use a can of frosting and wrap the yarn that way. I like the size that the can produces. If you do not know how to make a pom pom there are some very helpful videos on you tube like this one: http://www.youtube.com/watch?v=AS5innWg8Eg

Once the pom pom is assembled, sew it on to the top of the hat.

Leg Warmers (make 2):

Using the teal yarn CH 14. Join with SL ST to first CH. Be sure not to twist the CH. CH 3
Round 1: Still using teal DC in each CH. (14 DC)
Round 2: Switch to red. CH 3. DC in each DC. (14 DC)
Round 3: Switch to white. CH 3. DC in each DC. (14 DC)
Round 4: Switch to red. CH 3. DC in each DC. (14 DC)
Roung 5: Switch to Teal. CH 3. DC in each DC. (14 DC). Finish off and weave in ends.

Monday, February 25, 2013

PATTERN: The Breast Boobie Beanie Ever

I love all the support that is circulating for breastfeeding mommas. Somehow our culture has gotten away from breastfeeding and many view it as gross or inaproppriate. That needs to change, no excuses. Breastfeeding is normal, healthy, and a wonderful way for mom and baby to bond. I think more women would give it a chance if they were supported by their significant others, friends, family and the general public.

I just finished a boobie beanie and I love it! The crochet pattern is quick and easy. It will probably take you only 20 minutes to whip this little hat up.

Enjoy and share the love for breast feeding mommas.


This Pattern will make a 3 Mo size hat. Use a 5.5 MM Hook.


CH = Chain

SL ST = Slip Stich

SC = Single Crochet

DC = Double Crochet


In nipple color:

Magic ring. CH 3. 7 DC in the ring. Join with SL ST. CH 1

Round 1: 2 SC in each DC around. Join with SL ST. CH 3 (14 SC)

Round 2: *2 DC in first SC, DC in next SC.* Repeat around (20 DC)


Switch to flesh color:

Round 3: CH 3. *2 DC in first SC, DC in next.* Alternate around. Join with SL ST to the top of CH 3 (30 DC)

Round 4: *2 DC in first DC, DC in next two.* Repeat around. Join with SL ST to the top of CH 3 (40 DC)

Round 5-9: DC in each DC around. Join with SL ST to the top of CH 3. (40DC)

Round 10: DC in each DC around. Join with SL ST to the top of DH 3. CH 1 (40DC)

Round 11: SC in each DC around. (40SC) Join with SL ST. Finish off and weave in ends.


Don't know how to crochet? No problem, you can purchase one on etsy! http://www.etsy.com/shop/AdairToCrochet?ref=si_shop

Wednesday, January 23, 2013

Hello Blogging World

Today marks my very first day as a blogger! What a great way to start a new year; documenting my wild ideas and refreshed enthusiasm for crafting. May 2013 be filled with creativity.

Now back to work. ;) Tonight I will be adding a black beard to my line up of beard hats. Can't wait to see how it turns out.